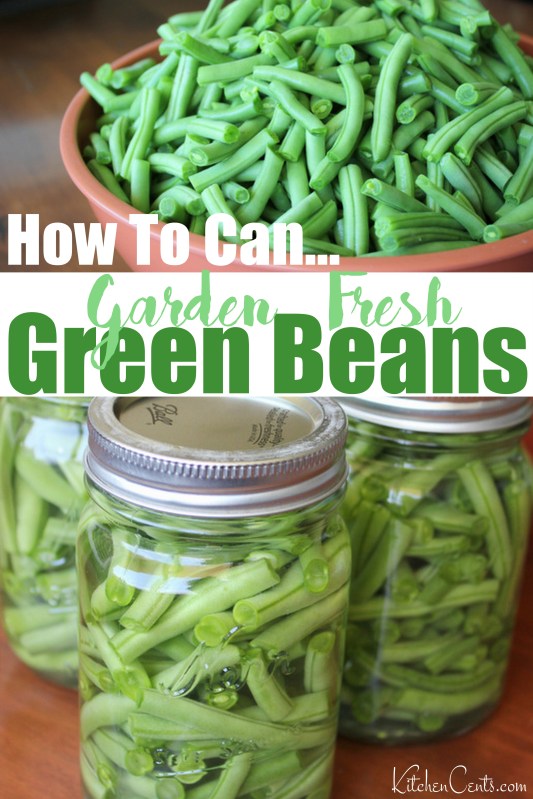
Learn how to make Home-Canned Fresh Green Beans. Preserve garden-fresh green beans for year around enjoyment.

Do you need a quick vegetable for dinner?
Planning ahead and canning veggies when they are in season is a great way to add quick veggies to your dinner table and save some moolah in the process.
I enjoy spending an afternoon canning to make weeknights a little easier and meals a little quicker. These canned green beans do just that and can be used in dishes like soups, side dishes, casseroles, even your favorite green bean casserole for Thanksgiving.
WHY CAN YOUR OWN GREEN BEANS?
Canning has generally been used as a method of preserving foods that may become sparse (such as fresh veggies, fruits, juices, and even meats). If you grow your own fruits and veggies or know someone with a garden willing to share, canning your own is a great way to build food storage. It’s less expensive than buying them from the store.
I love being able to just walk into my pantry or food storage and grab a jar of beans, peaches or canned rosemary chicken breast knowing it was cheap or free, shelf-stable, and free of preservatives I can’t even pronounce. I love knowing they will taste great and are healthy for us.
FEWER PRESERVATIVES!
Home canned green beans have fewer preservatives and are canned in a glass jar. These, compared to the tin-canned vegetables you buy in the store, are better on the environment.
By canning your own beans you know exactly what’s in them and I love that.
LESS EXPENSIVE THAN STORE-BOUGHT GREEN BEANS
If you grow your own beans (or have someone that does), canning your own is less expensive than buying them from the store, after the cost of a canning lid and initial investment for glass canning jars.
Store-bought canned green beans are great… but home-canned are even better because they taste better, in my opinion, and are less expensive.
So, if you find yourself looking for a quick veggie to add to your dinner table, look no further, home canned green beans to the rescue.
CANNING FRESH GREEN BEANS IS SIMPLE:
What you’ll need:
- fresh green beans
- salt
- water
- jars (quarts or pints)
- sealing lids
- sealing rings
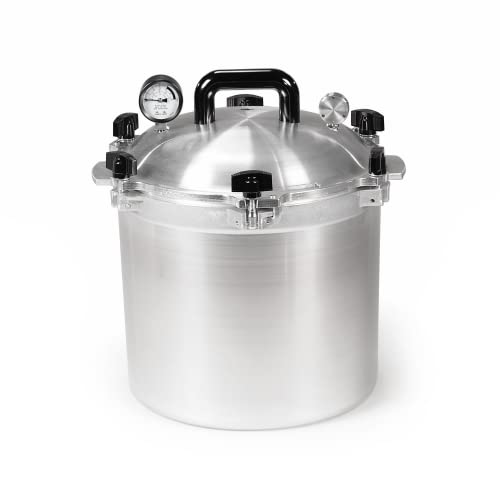
- pressure canner
- canning tongs (to remove hot jars)
HOW TO:
Once you’ve picked (or bought your beans), washed and snipped the ends. You can cut them into bite-sized pieces or keep them long. I prefer pieces that are about an inch long. These beans came out of my garden (and some from my parents garden).

Once your beans are ready and your jars are sterilized, you’re ready to fill them.
Put about an inch of hot water in the bottom of each jar along with 1/2 teaspoon of salt. Don’t forget the salt! If you forget the salt the beans will taste very different (in a bad way, I think).
Swish the water and salt to help the salt dissolve. Once the salt is mostly dissolved fill each jar with the prepared green beans.
Fill to an inch from the top. Pack em’ in like sardines. 🙂
PRO TIP #1: To sterilized jars, run them through an express hot wash cycle in the dishwasher.

Next, fill each jar with hot water (to 1 inch from the rim). That will be about to the neck of the jar.

Wipe each rim clean with a wet washcloth to ensure a strong clean seal. Add sealing lids and rings.
READY FOR PROCESSING:
Now it’s time to pressure can these babies.
I won’t lie… up until recently pressure cooking and canning freaked me out.
The thought of a metal pot full of hot water and jars under pressure… yikes! BUT I’m here to say, my pressure canner has become one of my best friends in the kitchen.
I love using it to preserve the things I grow in my garden and to build my food storage. I’ve even canned rosemary chicken breast and black beans.
With that said, make sure you read the instructions to your pressure canner before beginning processing.

The amount of pressure you’ll need will vary depending on where you live.
I live in Utah at about 5500 feet above sea level so I need to keep my pressure canner at or above 13 lbs. Process time will vary depending on if you’re using pint or quart size jars.
Process pints for 20 minutes and quarts for 25 minutes. Remember this time doesn’t start until the pressure canner reads the right poundage.
Once they are done processing let the canner cool. Do not open the canner until there is no pressure inside otherwise you might get hurt and your jars may not seal correctly.
FINISHING UP…
Once you open the canner use your jar tongs and lift the jars out carefully (they will be very hot) onto a cooling rack or towel.
As they cool the lids will suction down and seal. You will hear the sweet sound of success as each lid makes a click pop sound as they seal. To hear that sound is one of my favorite parts of the process. 😉 It’s such a satisfying confirmation of a job well done if I do say so myself.
Once cooled, push each lid down to ensure it sealed. If a lid clicks and pops back up, that means it hasn’t sealed properly, you can store it in the fridge and enjoy within a week or so.

Look at you! You’re a pressure canning pro! 😉
Even though it seems like a lot of work now, in the long run, it’ll save you time, money and provide great homemade food in place of less healthy alternatives.
STORAGE:
How long will these home-canned green beans keep?
Short answer, 1+ years.
Longer answer… According to the National Center for Home Food Preservation, “Properly canned food stored in a cool, dry place will retain optimum eating quality for at least 1 year.”

How To Can Fresh Green Beans
Learn how to can fresh green geans for less right at home. Fresh, clean, and no unpronounceable preservatives. Clean eating at its finest!
Ingredients
- fresh green beans, ends snipped and cut into bite-size pieces
- sea salt
- water
TOOLS NEEDED:
- jars (quarts or pints)
- sealing lids
- sealing rings
- pressure canner
- canning tongs (to remove hot jars)
Instructions
Sanitize jars, lids, and rings.
Add 1 inch of water along with 1/2 teaspoon salt (for pint-size jars) to each jar. Add 1 teaspoon salt to each quart size jar.
Pack with fresh green beans (pack'em in tight). Pack them in until they reach just under the neck of the jar (about an inch from the top).
Add water until it reaches the neck of the jar (about an inch from the top of the jar).
With a wet washcloth or paper towel, wipe the rim of the jars to remove anything that would discourage a strong seal.
Add a sealing lid and ring. Secure ring well. Make it tight.
Process green beans according to your pressure canner and altitude.
Remove jars from pressure canner once pressure has fully released from the canner. Place on a towel or wire rack to cool. Do not disturb jars until fully cooled.
Let jars cool fully before moving to storage. Double-check that all lids sealed before storing.
Notes
- Store properly sealed jars for up to 1+ years.
- If you have a jar that does not seal after cooling (the lid sounds like a button and can be pushed down then pops back up), store jar in the fridge and enjoy within a week.
Recommended Products
As an Amazon Associate and member of other affiliate programs, I earn from qualifying purchases.


What else have you canned?
*This post may contain affiliate links. In order to support this blog and continue providing free content, I may receive a commission from purchases you make through the links in this post.
OP: 10.28.16 Updated: 8.23.20
Nothing like home-grown, canned green beans. Great pictures and information!
Haha… I think most of these beans are one that came from your garden. Thanks again!