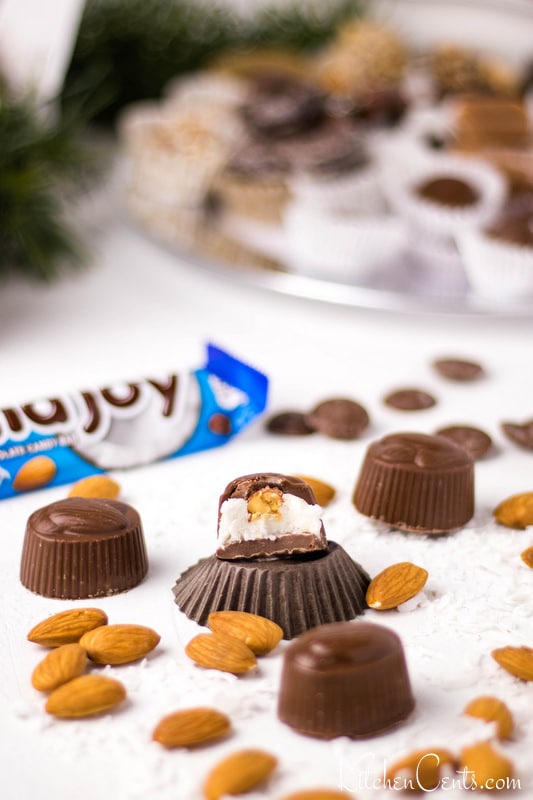
Learn how to make homemade Almond Joy chocolates filled with creamy coconut filling and toasted almonds. A delicious copycat recipe any Almond Joy lover will enjoy.

This post may contain affiliate links. If you click on a link and make a purchase, I may receive a small commission at no extra cost to you.
Coconut and almond are beautiful flavors to pair with chocolate. If you are an Almond Joy candy bar lover you are going to enjoy this recipe so much!
Every winter my sisters and mom get together for a weekend of chocolate and candy making. You can read more about that in my Christmas Traditions: Candies & Chocolates post.
We made over 185 pounds of candies and chocolates in 2020. These delicious Homemade Almond Joy Chocolates were included in the beautiful boxes of chocolates we made for friends and family.
Check out this little video I made to show you how to make your own homemade Almond Joy chocolates.
WHAT DO I NEED TO MAKE THESE HOMEMADE ALMOND JOY CHOCOLATES?
- Fondant cream centers- recipe on printable recipe card at the bottom of this post.
- Sweetened coconut flakes
- Coconut extract flavoring
- Toasted almonds (whole or chopped)
- chocolate (whatever kind you prefer)
- Chocolate candy mold
- Food grade paintbrush
All the Almond Joy lovers in your life are going to love and enjoy this copycat Almond Joy recipe.
HAND-DIPPED VS MOLDED CHOCOLATES:
Hand-dipping chocolates are created by dipping a candy center into melted chocolate, coating completely then set aside to harden.
Molded chocolates are created by coating a chocolate mold with a thin layer of melted chocolate, let it harden then add the center and chocolate to seal it in.
For years and years, we only hand-dipped our chocolates. About 5 years ago my Aunt Deena (Ryan’s aunt) introduced me to molding chocolates. She, also, makes a LARGE number of chocolates each year to gift to friends and family.
We now do a mixture of hand-dipped and molded chocolates.
For these homemade Almond Joy chocolates, you can hand-dip or mold them. For our Christmas chocolate boxes, we opt to make them in a mold with an almond design on top. Molded chocolate look more professional.
If hand-dipping is your choice of dipping method, shape the coconut filling into small 1 inch by 2 inches by 1/2 inch logs. To the log, add chopped almonds or 2 whole almonds. Chill to make firm then dip in melted chocolate. Hand-dipping will look more rustic but will taste just as good.
From my experience, hand-dipping chocolates are faster to produce BUT molded chocolates tend to look more “professional” especially if this is your first experience making homemade chocolates.
For additional information on how to make chocolates at home, check out my post Tips & Tricks for Making Homemade Chocolates. I share a lot of information that can be very helpful for any beginner chocolatier.
IF YOU LIKE THIS CHOCOLATE RECIPE, YOU MAY ALSO LIKE THESE:
- White Chocolate Peanut Butter Cups
- Peppermint Bark
- Peppermint Patties
- Butter Almond Truffles
- Tiger Butter Bark
- Soft Homemade Caramels
- Black Anise Caramels
- Peanut Butter Balls
- Peanut Brittle
- English Toffee
- Peanut Butter Cups
- Smores Presents
- Cherry Cordial Chocolates
- Caramel Pretzel Rods
- Orange Cream Chocolate
COMING SOON! Stay tuned for these additional recipes.
- Raspberry Cream Chocolates
- Oreo Bark
- Lemon Cream Chocolates
- Classic Peanut Clusters
- Bavarian Mints

HERE IS THE FULL PRINTABLE RECIPE. ENJOY!

Homemade Almond Joy chocolates
Homemade Almond Joy chocolates filled with creamy coconut filling and almonds. A copycat recipe for any Almond Joy lover!
Ingredients
- 1 cup whipping cream
- 3 cups white granulated sugar
- 2 Tablespoons corn syrup
- 1 Tablespoon butter
- coconut extract flavoring, start with 1 1/2 teaspoons, add more if desired, the strength of your extract will directly impact the strength of flavor
- 14 oz bag sweetened coconut flakes
- 3-4 cups Chocolate melted
- 1 lb almonds, toasted (whole or chopped)
Instructions
- In a large heavy saucepan add cream and sugar together. Let soak for a few minutes.
- After soaking, bring to a slow boil over medium to medium-high heat. Add corn syrup. Stirring constantly.
- Using a pastry brush and water to wash down sides of pan several times while boiling.
- Using a candy thermometer, cook to 238°F *See notes regarding calibrating your thermometer.
- Pour mixture out onto a damp marble slab, cookie sheet, or chilled mixing bowl (avoid glass as the mixture is very hot). DO NOT scrape pot sides when pouring the mixture. This can cause the fondant to have a gritty sugary texture rather than smooth and creamy.
- Place 1 Tablespoon of butter in the center of the batch.
- Cool until warm to touch (5-10 minutes) then beat or use bread hook in an electric mixer. Beat until mixture turns creamy and dough-like.
- Add coconut extract flavoring.
- Add coconut flakes. Mix until completely incorporated. Cover or place in an airtight container until ready to use.
- If HAND-DIPPING, form coconut mixture into 1 inch by 2 inches by 1/2 inch logs. Press 2 almonds on top of each log. Cover and chill until firm. Once firm, dip in melted chocolate. Please on a sheet of waxed paper or parchment paper until set.
- If MOLDING, use a silicone or plastic candy chocolate mold. For cleaning and use of chocolate molds, See post on Tips & Tricks for Making Homemade Chocolates. Fill each mold with 1/3 to 1/2 full of melted chocolate. Using a brush, coat sides (paint sides). Raise mold to the light to ensure each mold is fully coated. Place in freezer until hardened (about 5 minutes). Place an almond or chopped almonds in each mold. Fill ALMOST to the top with coconut filling. Cover top with melted chocolate to seal. Place back in the freezer to set (about 5 to 10 minutes). Once set, carefully flip and tap. If chocolates are cold enough, they will just fall out. Do not heat mold or chocolate. This will make the chocolates stick in the mold.
- Store in an airtight container. Best if enjoyed when freshly made but if kept in a cool dry place, these chocolates will keep for weeks if not months.
Notes
- The cream center base can be made several days before flavoring and dipping. I recommended making the fondant centers at least the night before or 24 hours before dipping to allow the sugar to soften.
- To calibrate a thermometer, put the thermometer into boiling water. Water boils at 212 degrees at sea level. Look up the boiling point of water for your altitude. Read the temperature of your thermometer when the water at a full boil. If it doesn't match the boiling temperature for your altitude, you will need to adjust your recipe temperature by the difference between the boiling point at your elevation and the temperature your thermometer is reading at a full boil. For example, if my thermometer reads 202 degrees when the water boils at sea level, my thermometer reads 10 degrees less than accurate. This means when I cook a candy that needs to reach 238 degrees, I will have met 238 degrees when my thermometer reaches 228 degrees (more or less assuming the error in the thermometer is constant across all temperatures).
Recommended Products
As an Amazon Associate and member of other affiliate programs, I earn from qualifying purchases.


Almond Joys always get a bad wrap but I love them!!! So tasty.