• Skip to primary navigation
  • Skip to main content
  • Skip to primary sidebar
  • Skip to footer
  • HOME
  • RECIPE BOX
  • ABOUT ME
  • POLICIES

Kitchen Cents logo

  • Email
  • Facebook
  • Instagram
  • Pinterest
  • YouTube
You are here: Home / DIY / DIY Reversible Clothespin Wreath

February 7, 2023

DIY Reversible Clothespin Wreath

An easy do-it-yourself clothespin wreath made with clothespins, festive colorful paper, and beautiful Valentine’s and St. Patrick’s day embellishments. 

diy-reversible-valentines-wreath-kitchencents-com

Are you looking for a great, easy DIY Valentine’s craft that will make your home beautiful and festive? 

This DIY Reversible Clothespin Wreath for Valentine’s day, with a reverse St. Patrick’s day theme, is a great DIY craft that will last from January to March.  Who doesn’t love that?!

With its colorful clothespin design, fun embellishments and inexpensive costs, this wreath is a great way to add a little festive spirit right on your front door for very little cost.  If you are like me, with the attitude that crafting is always better cheap or free, you will love this wreath.

LOOKING FOR MORE HOLIDAY FUN?

VALENTINE’S DAY IDEAS:

  • Red Heart Brownie Teacakes
  • 5-Minute Chocolate Mousse
  • Valentine’s Turtle Pretzels
  • Valentine’s Buttermilk Pancake Bites
  • Pretty Pink Raspberry Mousse
  • Dessert Charcuterie Board
  • 27+ Chocolate Valentine’s Desserts
  • Easy Valentine’s Glitter Heart Burlap Wreath (under $5)
  • Mermaid Valentine (with FREE printable)

ST. PATRICK’S DAY IDEAS:

  • Andes Mint Brownie Bites
  • Easy Homemade Peppermint Marshmallows
  • Rainbow Frozen Yogurt Bark
  • Easy Rueben Bombs
  • Green Pesto Rolls
  • Mint Mousse Chocolate Cups
  • Mint Marshmallow Chocolate Surprise Cookies
  • Green Smoothie
  • Easy Andes Mint Fudge

SUPPLIES AND TOOLS TO MAKE A CLOTHESOIN WREATH:

Supplies:

  • 8 different Valentine’s papers (pinks, reds, whites, etc)
  • 8 different St. Patty’s papers (greens, whites, shamrock, etc)
  • 98 wood clothespins (2 packs of 50 or 1 pack of a 100)
  • Mod Podge
  • 18″ box wire wreath frame (you can find these at most craft stores.  I found mine at JoAnn and used a  JoAnn coupon).
  • embellishments (hearts, flowers, clovers, shamrocks… I found most of my embellishments at the dollar store or craft store. I used burlap ribbon for both).
  • wire or string to attach embellishments

Tools:

  • paper cutter or scissors and ruler
  • brush for mod podge
supplies

DIFFICULTY LEVEL FOR MAKING A CLOTHESPIN WREATH:

It’s really quite simple.  On a scale from easy to extremely hard I would say this clothespin wreath would land around easy to medium difficulty. Even a beginner crafter can create their own DIY wreath with my step-by-step guide. There are multiple steps but you can see the step-by-step directions below.

HOW TO MAKE A CLOTHESPIN WREATH FOR THE HOLIDAYS:

First – Cut papers to fit clothespins

Start with the paper.  You will be making a total of 98 clothespins.  Depending on how many different paper patterns you choose, will help you decide how many of each paper you will need to cut.  I chose 8 different patterns for each side and so I needed 13 of each pattern.  If you do what I did, you’ll end up with a few extra that way (104).  Cut each paper to fit the length of your clothespins.   Then cut those into long strips the same width as your clothespins.  Most clothespins are about 3 1/4 inches long and 3/8 inch wide.

cut-papers

Double check by finding the measurements on the clothespin package or by measuring them yourself.
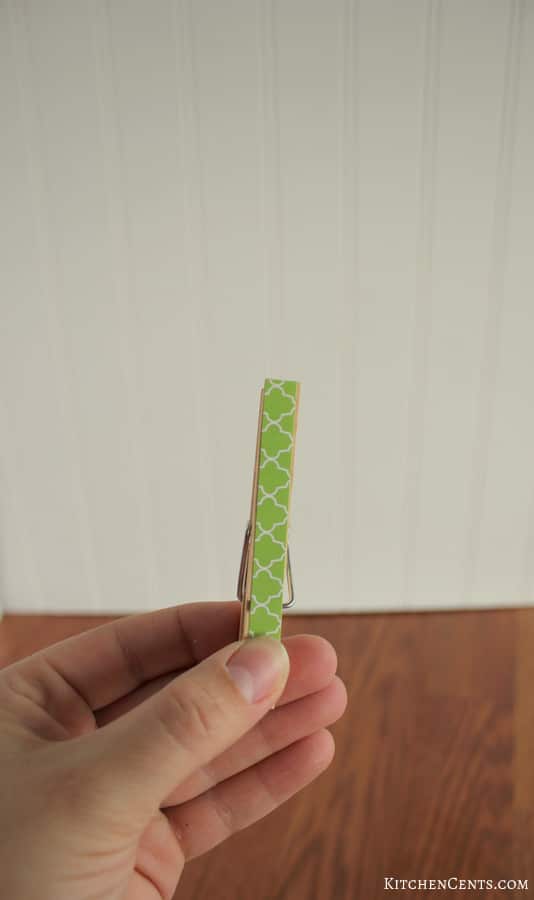
make-sure-they-fit-clothespins

Second – glue colorful papers to both sides of clothespins

It’s easiest if you work on one side of the clothespins at a time.  Make sure you match up which Valentine’s and St. Patrick’s papers you want with which.  It’ll be much easier to switch the wreath between holidays if you match the papers for the different holidays so the pattern works when flipping them over.  For example, I want all the red polka dot paper to be on the same pins as all of the green and white clover paper.  After figuring out what paper patterns you want to use together, brush a small amount of mod podge onto one side of the clothespin, apply the paper, then mod podge over the paper to seal it.  Let dry.
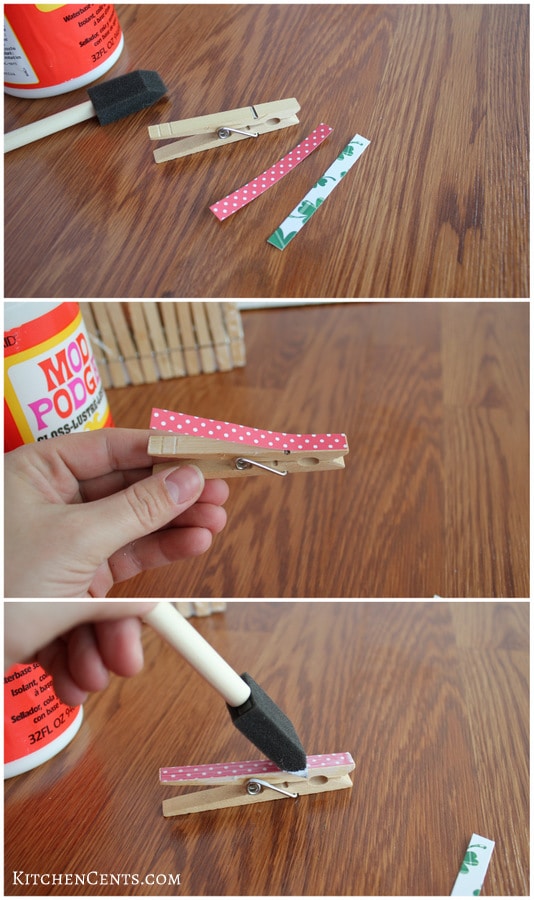
Ki

Once the first side is dry, do the same thing on the opposite side.  Use the paper pattern you chose for the second holiday.
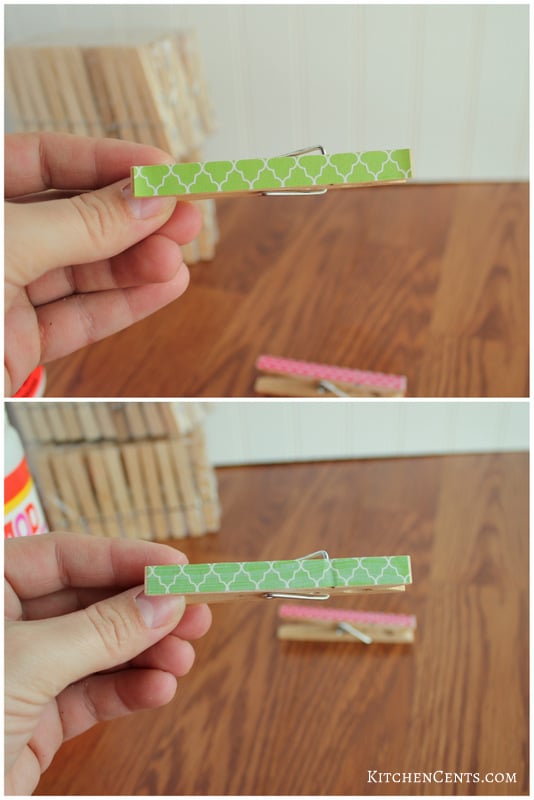
dry-and-do-back

I took this clothespin apart after finishing it so you could see each side.  The Valentine’s side is red and white stripes and the St. Patrick’s day side is a green pattern.
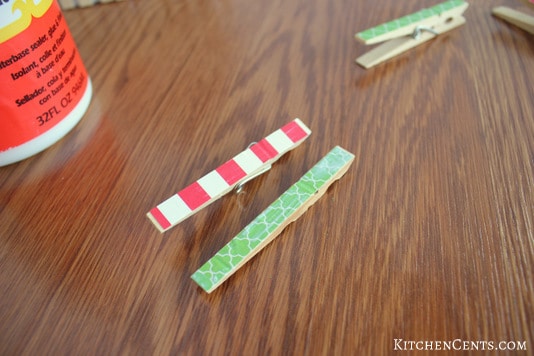
front-and-back

I just loved having so many different patterns. 🙂  Aren’t they so pretty?!
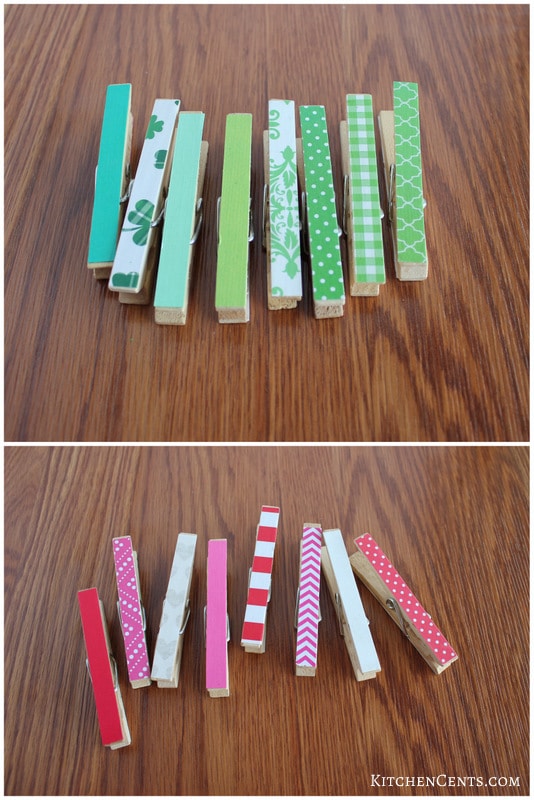
8-different-papers-per-side

You will end up with a very large pile of pretty and colorful clothespins.
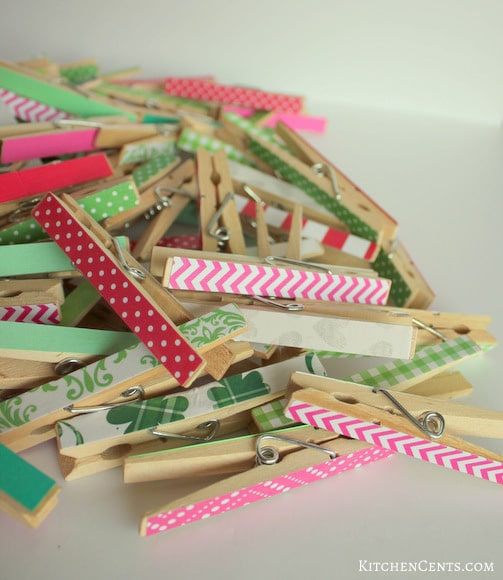
pile-of-clothespins

Next, sort each pattern into an individual pile.  This will make putting the wreath together much easier and quicker.  You might even want to line them up in the order you’d like to place them.
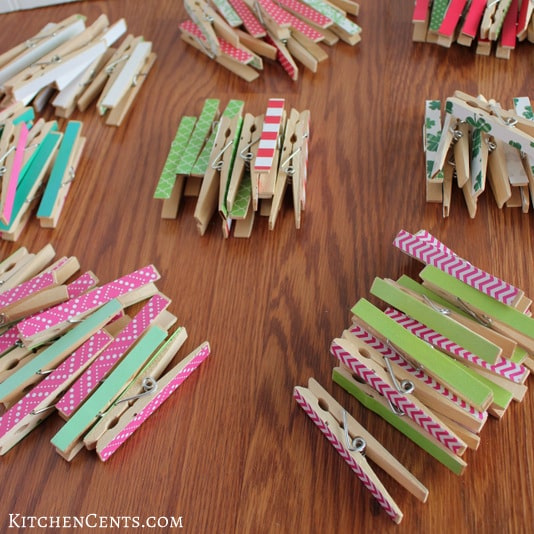
all-the-clothespins

Third – Pin clothespins in a patter on the wire wreath

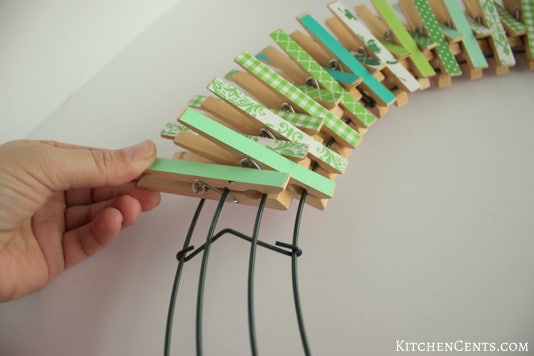
Grab the wire wreath frame.  As you clip the colorful clothespins onto the frame, alternate from the bottom two wires to the two middle ones.  This gives it a fun wavy look.
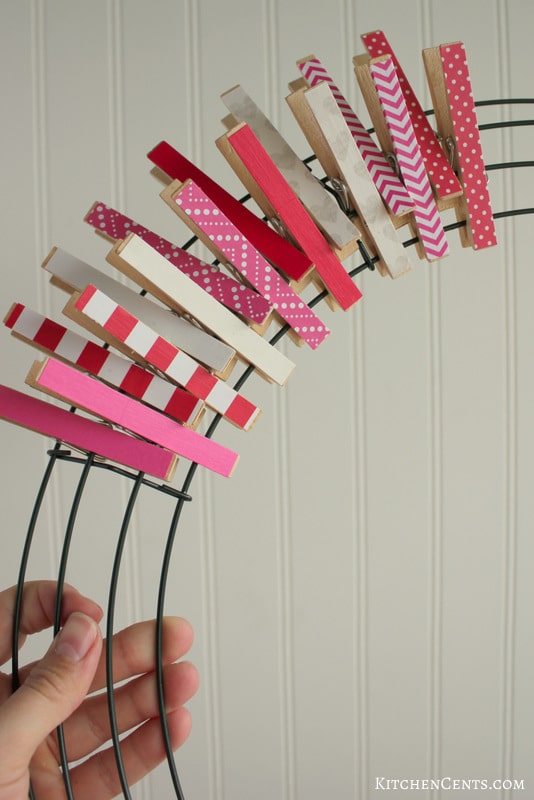
alternate

Here’s another picture with the St. Patty’s side.  Make sure you always clip to 2 wires to make sure the clothespin is secure.
alternate-clothespins

Fourth – Make and attach the embellishment to the clothespin wreath

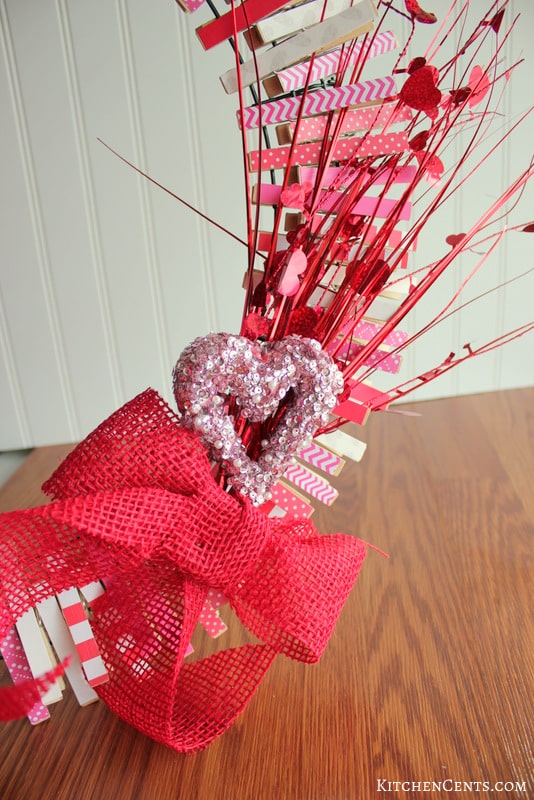
Once the wreath is full, make your embellishments.  For the Valentines side, I used a couple fun red center-piece things (I am not sure exactly what these are called), a pink sequin heart and 2″ red burlap.  I attached the embellishments together with a wire from a twist tie.

make-embelishment

Then, I made a bow with the 2″ red burlap and attached it to the heart embellishment with more wire.  Pretty festive if I do say so myself.

valentines-embelishment

I used a heavier wire to attach this to the wreath.  Make sure whichever method you use to attach it, it’s removable as you’ll need to remove it to reverse sides.
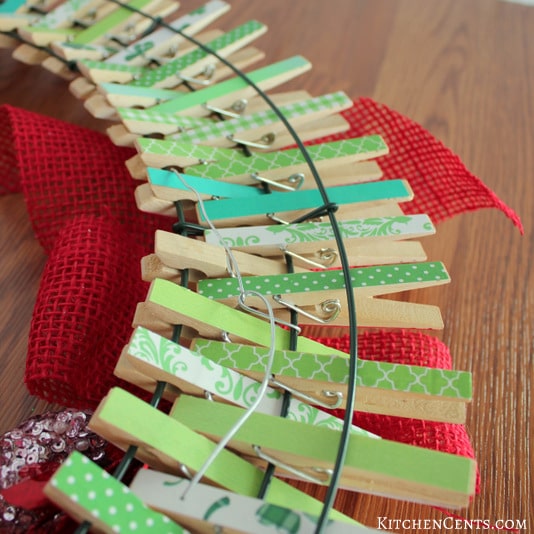
wire-embelishments-on

Here’s the embellishment all attached and ready to go.  I can already feel love in the air! 😉
attach-embelishment

Fifth – Hang your beautiful creation

You just made your very own Valentine’s Clothespin Wreath!

Finally, your new festive holiday wreath is ready to hang on your door.  I hang mine with a door hanger, which you can attach to directly or via a ribbon if you want some extra flare.  Here’s mine… all done!

valentines-wreath

Here’s a full-door shot of the reverse side, for St. Patrick’s.  I’m sure it will bring me some luck and a leprechaun or two. Hehe.

front-door-wreath

How fun is that?!  I just love these, especially because I can use it for more than a month.

st-pattys-wreath

This wreath is fun, festive (for two holidays) and easy to make.  It is a great DIY holiday craft sure to bring a little love and a bit of luck this Valentine’s and St. Patty’s Day!

Easy DIY Valentines Clothespin Wreath | Kitchen Cents

OP: 1.11.17                      Added images: 1.12.19 Updated: 2.7.23

*This post contains affiliate links. In order to support this blog and continue providing free content, I may receive a commission from purchases you make through the links in this post.

Filed Under: Crafts, DIY Tagged With: DIY, Holiday, Homemade

Reader Interactions

Comments

  1. Rachel says

    June 29, 2021 at 4:21 pm

    Hi Carol! Thanks for stopping by. I made this wreath several years ago and shared my “how to” to help others make their own. Unfortunately, I do not sell them. You may be able to find a shop on Etsy that can make one similar. Good luck and again, thank you for stopping by!

  2. Carol Glasmann says

    June 7, 2021 at 1:31 am

    I would like to buy the clothespin reversible st. Patrick’s day wreath.

  3. Rachel says

    January 30, 2020 at 4:29 pm

    So awesome! I want to do a painted one for the 4th of July. Red and white pins with a few blue with stars. Thanks for stopping by and sharing!

  4. Melissa says

    January 29, 2020 at 8:49 pm

    I did the wreath a little different I painted the clothespins instead of cutting and pasting the papers on each pin. It turned out great! Thanks it was fun to put together!

  5. Rachel says

    January 21, 2020 at 11:48 am

    Awe! Thank you so much. I’ve never sold one but they sure are fun to make. 🙂

  6. Peggy Hitchcock says

    January 21, 2020 at 5:51 am

    Do you ever sell your great wreaths?
    They are beautiful!

  7. Rachel says

    October 19, 2019 at 8:30 am

    Hi Phyllis! I flip mine so the wires on the wreath frame aren’t in the way. My mom leaves hers and just flips the whole thing rather than bothering with moving all the pins. Hope this helps. 🙂

  8. Phyllis says

    October 15, 2019 at 7:24 am

    Do you have to reverse the clothespins for the second side and reclip then as opposed to just flipping the wreath??

  9. Rachel says

    September 2, 2019 at 9:18 pm

    Yes, when you get ready to switch sides you simply just turn the clothespins around to show the other side. It does take 5-10 minutes to switch because you have to take each clothespin off and put it back on. Hope this helps 🙂

  10. Meg says

    September 2, 2019 at 7:07 am

    Do you reassemble for the reverse look? I’m assuming so based on the photos, but just wanted to check to see if I’ve missed something.

  11. Rachel says

    January 15, 2019 at 9:09 am

    Oh my goodness! I just love that! My girls (at least the 6 and 4-year-old) love helping me with projects like this one. So sweet of him that he gave it to his mom!!! Thanks for sharing Debbie. Made my day!

  12. Debbie says

    January 14, 2019 at 11:59 pm

    Thank you for sharing this great 2 holiday wreath. My grandson did all his clothes pins this afternoon. He’s so excited to finish it and gave it to his mom.

  13. Rachel says

    January 17, 2017 at 2:40 pm

    Right?! I love the look but being reversible is where it’s at. 🙂 Glad you liked it.

  14. Vaishnavi says

    January 16, 2017 at 11:56 pm

    Wow, such a lovely valentines day idea. Love this. Absolutely adorable work of art. Love the colors and that it is a DIY!

  15. Katya says

    January 16, 2017 at 5:14 pm

    That’s such a cute Valentine’s Day idea! It seems like not that difficult to repeat and I love the fact that it’s reversible! Two holidays in one DIY is perfect!

  16. Diane Hickman says

    January 15, 2017 at 7:01 pm

    Oh My Goodness this is amazing! Plus it could work for so many holidays if you change the color scheme! Thanks for sharing!

  17. Nikki Arnold says

    January 15, 2017 at 4:02 pm

    This is such a fabulous idea!! Two wreaths in one and such a simple project as well. I bet you could do this as a Fall/Christmas wreath as well!!

  18. Reesa Lewandowski says

    January 15, 2017 at 11:57 am

    Well how smart is this??? And easy! I love having a wreathe on my door and the time between Valentine’s Day and St. patty’s usually finds it blank!

  19. Jeanine says

    January 15, 2017 at 11:00 am

    What a really great idea! My girls would love to do something like this for their door for Valentines day, and they’d probably keep it there!

  20. Misty Dawn Nelson says

    January 15, 2017 at 8:05 am

    This is such a good idea and I can’t believe that we are talking about Valentines day, I love this DIY project

  21. Toughcookiemommy says

    January 15, 2017 at 4:59 am

    This Valentine’s Day wreath is so cute and creative. I never would have thought to use clothes pins for a craft like this but they really work.

  22. Amanda Rosson says

    January 14, 2017 at 10:58 pm

    This is too cute and I absolutely LOVE that it’s reversible too – what a smart and crafty idea!

  23. Brittany says

    January 14, 2017 at 9:15 pm

    I love this! The biggest thing I hate is how little time we get to leave up our decorations. This would solve it! It’s so cute too!

  24. Heather says

    January 14, 2017 at 9:01 pm

    What a great idea and so easy to switch it out for the St. Patty’s Day festivities! I’ve never thought of doing that but I love that tip!

  25. Mandy Carter says

    January 14, 2017 at 8:47 pm

    Love this idea! So practical for holidays so close together. This would also work great for Halloween and THanksgiving too.

  26. Silvia says

    January 14, 2017 at 7:45 pm

    This is so cute! This is such an easy project and I absolutely love that it’s a two for one type of project! Those are always the best to have.

  27. Lindsey Paris says

    January 14, 2017 at 12:03 pm

    For a second I thought I’d just be able to FLIP it around and not reverse the pins, but I had it wrong in my head. This is a great and easy craft for both holidays.

  28. Kimberly @ Berly's Kitchen says

    January 14, 2017 at 11:22 am

    I think this is so adorable! Wish I was crafty because I would love to make this. What a neat idea! About to tweet it. 🙂

  29. Bobbi | Bobbi's Kozy Kitchen says

    January 14, 2017 at 10:58 am

    What a great idea! I love that it is reversible so it saves on storage space. 2 for 1 🙂

  30. Laura says

    January 14, 2017 at 10:21 am

    This is so cute and looks so simple to make! These would make cute gifts too!

  31. Patricia @ Grab a Plate says

    January 14, 2017 at 9:42 am

    Such an adorable idea! So creative and so practical, too. It can be a chore to keep us with your wreaths, but this is a great solution!

  32. Roxanne says

    January 13, 2017 at 8:28 pm

    This is super cute! Looks easy and I love that it does double duty for both holidays!

  33. hal bloss says

    January 13, 2017 at 8:05 pm

    Such a fun project! Always looking for fun projects to do with my niece – def going to do it – thanks!

  34. Divya @ Eat. Teach. Blog. says

    January 13, 2017 at 6:39 pm

    What a creative idea! I love the idea of making a wreath for other holidays besides Christmas!

  35. Cori says

    January 13, 2017 at 5:29 pm

    Well this is just the best little wreath project! I love decorating for all the holidays no matter how small so this is awesome!

  36. Nicola says

    January 13, 2017 at 4:32 pm

    I love this…am definitely going to give it a go! I love to have a wreath on my door…why save it just for Christmas? Wreaths all year round!

  37. Angela Tolsma says

    January 13, 2017 at 3:53 pm

    that is so neat that it is reversible! I never would have though to do that, looks simply to make too!

  38. Shela Yount | I Answer to Mom says

    January 13, 2017 at 2:09 pm

    HOW AWESOME!!! This is so simple and cute! I love that it’s reversible! <3

  39. Laura Rike says

    January 13, 2017 at 1:53 pm

    Thanks for this! It absolutely looks so cute and fairly easy to make! So creative!

  40. karen says

    January 13, 2017 at 1:25 pm

    Wow – so seriously impressive that you MADE all those clothespins! Really. I have seen pre-made ones that already have a design on them, so I think I would go that (easy) route, because this wreath is really fabulous!

  41. Belle says

    January 13, 2017 at 12:50 pm

    This is the most adorable wreath I’ve ever seen. Such a very creative idea to use clothespin.

    Belle | One Awesome Momma

  42. Rachel says

    January 13, 2017 at 11:24 am

    Washi tape is a fabulous idea! You’ll have to let me know how it turns out.

  43. andrea says

    January 13, 2017 at 11:04 am

    This is adorable! I am inclined to use washi tape because I am uber lazy but you have inspired to give this a try.

  44. Michelle - Lillian Abbey says

    January 13, 2017 at 8:56 am

    So cute! I love reversible decorations. Less stuff to store when the holidays are over! ??

  45. Adriana Renee says

    January 13, 2017 at 8:31 am

    This is so cute! I’m always looking for crafts to do with my niece!

  46. Sophie Gillum-Webb says

    January 13, 2017 at 4:46 am

    What a fabulous idea and to make it reversible is awesome!!!

    Sophie xx

    http://www.sophobsessed.com

  47. Elizabeth Doren says

    January 13, 2017 at 4:13 am

    So simple and cute. I imagine it’s super easy to store too? Next cold snowy craft day this is my project!

  48. Lauren says

    January 12, 2017 at 3:20 pm

    Such a smart idea!! I love the idea of two sides so you can switch it up!

  49. Rachel says

    January 12, 2017 at 10:02 am

    Candy, I couldn’t agree more! Any time I can make a holiday piece like this one work for more than a month, I’m down (and it’s an added plus that the cost is almost cut in half ? )

  50. candy says

    January 12, 2017 at 9:37 am

    Seen these kinds of wreath done before but never reversible which if your going to take the time to make one why not use it for more than one occasion. Plus save on clothespins,

Trackbacks

  1. 7 Valentine Wreath Ideas by Hard Working Mom says:
    January 30, 2023 at 11:02 am

    […] Reversible Valentine’s Clothespin Wreath (Kitchen Cents) […]

  2. 17 DIY Valentine's Day Wreath Ideas | The Mommyhood Club 2022 says:
    December 22, 2022 at 3:16 pm

    […] Reversible Clothespin Wreath […]

  3. 25 Beautiful Valentines Day Wreath Ideas - Sparkling Boy Ideas says:
    November 28, 2021 at 9:07 pm

    […] 17. DIY Clothespin Wreath […]

  4. 10 DIY Valentine's Day Wreath Ideas You Need For Your Love - You Know says:
    January 3, 2021 at 3:33 am

    […] Found at Kitchen Cents   […]

  5. 75 Best DIY Valentine's Day Wreaths - Prudent Penny Pincher says:
    December 16, 2020 at 11:39 am

    […] DIY Reversible Clothespin Valentine’s Wreath from Kitchen Cents […]

  6. 90 Easy Dollar Store DIY Valentine's Day Wreath Ideas that will Make your Front Door speak romantic verses - Hike n Dip says:
    June 13, 2020 at 9:17 pm

    […] #44. DIY Reversible Clothespin Valentines Wreath By Kitchencents […]

  7. 8 Fun Things You Need to Make for Valentine's Day - ClareIvatt.com says:
    February 6, 2020 at 11:00 am

    […] https://kitchencents.com/diy-reversible-clothespin-valentines-wreath/ […]

  8. 18 Valentines Day Wreaths Bringing Out A Romantic Touch To The Scene! | Pizza Time says:
    January 17, 2020 at 3:07 pm

    […] Details : kitchencents […]

  9. Valentine Wreath | Valentine's Day Decor for Your Door says:
    December 8, 2019 at 10:41 am

    […] DIY Reversible Valentine’s Clothespin Wreath – an easy do-it-yourself wreath made with clothespins, festive colorful paper, and beautiful Valentine’s Day embellishments. | Kitchen Cents […]

  10. 18 couronnes de la Saint-Valentin apportent une touche romantique à la scène! - Blog Des Femmes says:
    September 27, 2019 at 2:18 am

    […] détails: cents de cuisine […]

  11. 18 Valentine's Day wreaths bring a romantic touch to the stage! - Women Blog says:
    September 25, 2019 at 9:00 am

    […] details: kitchen cents […]

  12. ¡18 coronas de San Valentín le dan un toque romántico al escenario! - Blog de mujeres says:
    September 25, 2019 at 7:55 am

    […] detalles: centavos de cocina […]

  13. Sahneye Romantik Bir Dokunuş Getiren 18 Sevgililer Günü Çelenkleri! - Tr Blog says:
    September 25, 2019 at 7:53 am

    […] Ayrıntılar: kitchencents […]

  14. 18 Valentines Day Wreaths Bringing Out A Romantic Touch To The Scene! says:
    January 30, 2019 at 7:47 am

    […] Details : kitchencents […]

  15. February 2019 Budget-Friendly Bucket List - says:
    January 28, 2019 at 6:29 am

    […] Reversible Clothespin Wreath […]

  16. 15 DIY Valentine’s Day Wreaths You Can Craft (Part 2) – chuckiesblog says:
    January 26, 2019 at 3:15 pm

    […] DIY Reversible Clothespin Valentine’s Wreath […]

  17. 15 DIY Valentine's Day Wreaths You Can Craft (Part 2) - Style Motivation says:
    January 26, 2019 at 10:22 am

    […] DIY Reversible Clothespin Valentine’s Wreath […]

  18. 25+ DIY Valentine's Day Wreaths - Mommy Today Magazine says:
    January 17, 2019 at 7:13 am

    […] Valentine’s wreath made from clothespin. Get the directions from KitchenCents. […]

  19. 75 DIY VALENTINE’S DAY WREATHS FOR YOUR DEVOTED PARTNER – The Lifestyle Hacks | Food Recipes, Fitness, & DIY says:
    January 11, 2019 at 4:29 pm

    […] DIY Reversible Clothespin Valentine’s Wreath Valentine’s & St. Patty’s papers, wood clothespins, Mod Podge, wire wreath, embellishments, floral wire […]

  20. 14 Valentine's Day DIY Wreath Ideas | Southern Charm Wreaths says:
    February 6, 2018 at 12:26 pm

    […] Valentine Clothespin Wreath from Kitchen Cents  is adorable and it is […]

  21. DIY Reversible Clothespin St. Patrick's Day Wreath says:
    February 17, 2017 at 10:00 am

    […] Valentine’s Day past, on to St. Patrick’s Day we go.  In January, I shared a fun DIY Valentine’s Clothespin wreath tutorial.  I’m here to share the DIY Reversible St. Patrick’s Wreath side. ? Yay! […]

Leave a Reply

Your email address will not be published. Required fields are marked *

Primary Sidebar

Search Kitchen Cents

Rachel Koller Kitchen Cents Hi

Footer

Behind Kitchen Cents

Rachel is a mom to four cheeky girls, wife to a smarty pants computer geek, and lover of all things chocolate and cheesecake! Read more…

More Desserts:

Easy Smores Brownies for a crowd potluck dessert | Kitchen Cents
Rustic aspen tree wedding cake |Kitchen Cents
Mini Smores Brownie Trifle | Kitchen Cents
  • Email
  • Facebook
  • Instagram
  • Pinterest
  • YouTube
  • HOME
  • RECIPE BOX
  • ABOUT ME
  • POLICIES

Copyright © 2023 Kitchen Cents on the Brunch Pro Theme